Pages

Search This Blog

Tuesday, June 22, 2010

Apple Dumplings


An apple dumpling is an apple baked inside a piece of pastry. They are best served warm and maybe even with some ice cream on the side.

Preheat your oven to 375 degrees Fahrenheit.
You will need a 11" x 7" pan or a 9" x 13" pan.

Ingredients:

Syrup-
1-1/4 cups water
1 cup sugar
1/4 teaspoon cinnamon
1/4 teaspoon nutmeg
2 Tablespoons butter

Combine in a saucepan and bring to a simmer. Cover and let simmer for 5 minutes. Add butter to the syrup.
Set aside.


Pastry-
2-1/4 cups flour
1/4 teaspoon salt
2/3 cup shortening
6-8 Tablespoons water

Combine the flour and salt in a medium bowl. Cut in the shortening with a fork or pastry cutter until the shortening is the size of small peas.
Add the water a little bit at a time, mixing just til it is moistened.
Form it into a ball.
Roll it out on a floured counter or board to approximately 18" x 12" size.
Cut into 6 equal pieces.


Inside-
6 medium small apples
1/4 teaspoon nutmeg
1/4 teaspoon cinnamon
1/4 cup sugar

Peel and core the apples. You can use you vegetable peeler for this. Or you can use a separate apple corer to core the apples. Otherwise, you can slice the apple in half and cut the core out and stick both halves together on the pastry square.
Once all the apples have been peeled and cored, put them each on their own piece of pastry.
Combine the sugar, cinnamon, and nutmeg. Sprinkle over the apples.
Moisten the edges of the pastry squares with water.
Bring up the four corners over the apple and pinch the dough together to seal.
Place the pastry covered apple in the baking pan.
Pour the syrup over the dumplings.
Bake for 45 minutes or until the apples are tender and pastry is browned slightly.

To serve, spoon syrup over dumpling.

Makes 6 yummy apple dumplings.

Sunday, June 20, 2010

Chocolate Banana Bread


Take one bite and you taste chocolate. Take another bite and you taste banana. Two great tastes, all in one quick bread.

Preheat your oven to 350 degrees Fahrenheit.
Grease and flour(or use cocoa powder for coating) a 9" x 5" loaf pan.

Ingredients:

1/2 cup old fashioned oats, ground into a fine powder
1/2 cup flour
3/4 cup whole wheat flour
1/2 cup cocoa powder
1/2 teaspoon baking soda
1-1/4 teaspoons baking powder
1/2 teaspoon salt
1/3 cup butter, softened
2/3 cup sugar
2 eggs
1 cup mashed, ripe bananas(3-4 medium)
2 Tablespoons milk or cream
1 teaspoon vanilla extract

In a medium bowl,whisk together the ground oats, flours, baking soda, baking powder, salt, and cocoa powder. Set aside.
In another bowl, cream the butter and sugar until fluffy.
Add the eggs, banana, milk, and vanilla extract. Beat for 2-3 minutes with a mixer until the mixture has thickened and is somewhat smooth.
Gradually add the flour mixture, beating til smooth after each addition.
Make sure to beat just until smooth. Over-beating will cause the bread to peak in the oven.
Scrape batter into the prepared loaf pan.
Bake for 45-50 minutes or til the bread passes the toothpick test.
Leave the bread in the pan for 10 minutes. Turn out onto rack to cool completely.

Makes 1 loaf.

Saturday, June 19, 2010

Types of Cream


When cooking with cream, the recipe might state one thing and when you go shopping you are left wondering if you are buying the right kind.

When a recipe states whipping cream, you will most likely find heavy cream at the store. It is the same thing.

However, heaving whipping cream and ultra-pasteurized heavy whipping cream is not the same.
Ultra-pasteurized cream has been heated to a higher temperature to keep it fresher longer.
It is fine for recipes that are cooked, such as an Alfredo sauce.
But, if you intend to whip the cream, use regular pasteurized.
The ultra-pasteurized will give the whipped cream a cooked taste and it will also take longer to whip.

If you have a recipe that calls for heavy cream-for cooking, not for whipping- and you don't have any on hand you may use 3/4 cup milk plus 1/4 cup butter for every cup the recipe calls for.
You can also use 2/3 cup evaporated milk.

Half and half is simply half milk and half cream.

To make your own just use half milk/half cream.
You can also use 7/8 cup milk plus 3 Tablespoons butter or 1/2 cup evaporated milk plus 1/2 cup milk for every cup you need.

Light cream, also known as single cream, can be hard to locate depending on where you live.
So, if you can't find that, use half and half.

Tuesday, June 15, 2010

Measuring Sugar


You measure sugar differently depending on the type you are using.

Brown sugar is always packed tightly into the measuring cup and leveled off with a knife.
Brown sugar needs to be packed since it has more air in it than granulated sugar. So to get an accurate measure you need to pack it.

Granulated sugar is scooped and leveled off with a knife.

Powdered sugar should be spooned into a measuring cup and than leveled off with a knife.
Scooping it may cause it to get somewhat packed in and you want the powdered sugar to be fluffy and light in the cup.
That is the same reason you don't want to shake the cup to remove excess.
It will cause the powdered sugar to settle and you may end up adding more to the recipe than was intended.

Double-Decker Confetti Brownies


These bars are like a brownie and m&m cookies put together. Who could say no to that?

Preheat your oven to 350 degrees Fahrenheit.
Lightly grease a 9"x13" baking pan.

Ingredients:

3/4 cup softened butter(1-1/2 sticks)
1 cup sugar
1 cup packed brown sugar
3 eggs
1 teaspoon vanilla extract
2-1/4 cups flour
2-1/2 teaspoons baking powder
1/2 teaspoon salt
1/3 cup cocoa powder
1 Tablespoon butter, melted
1 cup m&ms, divided in two
1/4 cup flour

Cream the 3/4 cup butter and sugars in a large bowl.
Beat in the eggs and vanilla extract.
Combine the 2-1/4 cups flour, baking powder and salt. Add that to your butter/sugar mixture.

Remove half the batter and put in a separate bowl.
Mix the melted butter and cocoa powder and add to one half of the batter.
Spread that into the bottom of your baking pan.

Stir the 1/4 cup flour and 1/2 cup m&ms into the white batter.
Spread that batter over the cocoa layer.
Sprinkle the remaining 1/2 cup m&ms over the top of the bars.

Bake for 25-30 minutes or until edges start to pull away from the side of the pan.
Let cool before cutting.

Makes 24 bars.


Monday, June 14, 2010

How To Neatly Remove Cakes From Pans


Some cakes are just hard to remove neatly from pans.

If you don't leave them in long enough before you turn them out, sometimes the pan is old, sometimes it doesn't seem greased and floured well enough.
And the cake rips and some is left in the pan.

An easy way to avoid that problem to to use parchment paper to line the bottom of your pan.

To do this you need to cut the paper to fit the bottom of the pan.

Now, grease the whole pan. Don't flour though.

Lay the parchment over the bottom of the pan. Grease the parchment paper.

Now, you flour the whole pan.

When it is time to turn the cake out of it's pan, loosen the sides of the cake from the pan.

Take a plate or serving platter the size of your cake or even a little larger and turn it face down over the cake in the pan.

Quickly flip the pan and plate over so the pan is cake down over the plate.

Carefully lift up the cake pan. The cake should be laying on the plate.

Peel off the parchment paper.

To turn the cake right side up, take another plate and put it over the bottom and flip it again.

If you plan to use this method for cheesecakes, wait til the cake has been chilled well so it is firm enough to stay together.

Brownie Peanut Butter Cheesecake

Brownie peanut butter cheesecake is a very decadent dessert.
It is rich and just a small slice is enough to satisfy you.
The filling and topping is peanut butter and the crust is made of brownie batter.

Preheat your oven to 350 degrees Fahrenheit.
You will need a 9" spring-form pan that has been greased and floured.

Crust:

3 oz semisweet chocolate, grated or chopped.
1/4 cup butter(1/2 stick)
1/2 cup flour
1/8 teaspoon baking powder
2 eggs
1 cup packed brown sugar
1-1/2 teaspoons chocolate or vanilla extract

Filling:

12 oz cream cheese, at room temperature
1 cup packed brown sugar
3 eggs
1/2 cup sour cream or plain yogurt
1-1/3 cups creamy peanut butter

Topping:

3/4 cup sour cream or plain yogurt
2 teaspoons sugar
1/2 cup creamy peanut butter

To make the crust-
Melt the chocolate and butter in a double boiler or in the microwave. Set aside.
Combine the flour and baking powder. Set that aside.
Beat the eggs until thick and lemony colored.Beat in the brown sugar. Mix in the chocolate and the chocolate or vanilla extract.
Stir in the flour/baking powder, just until blended.
Spread 1 cup over the bottom of the prepared pan.
Put the rest of the batter in the fridge to chill.
Bake the bottom crust for 15-17 minutes until firm.
Take out of oven and refrigerate for 15-30 minutes.

While that is chilling make the filling-
In a large bowl beat the cream cheese and brown sugar until smooth.
Beat in the eggs and sour cream.
Beat in the peanut butter.
Set aside.

Take the batter and pan out of the fridge.
Use a spatula to spread the rest of the batter over the sides of the spring-form pan.
Put pan on its side and spread it, rolling as you go.
Quickly set upright and pour filling into the pan.
Some of the batter may drip down the sides. That's OK.

Bake for 30 minutes, or until the filling is firm.

Make the topping while the cheesecake is baking-
Put the sour cream, sugar, and peanut butter and a bowl and beat with mixer until smooth.

Three minutes before removing cheesecake from the oven, spread the topping over it.

Cool on a wire rack for 1 hour.
Cover and chill in the refrigerator for several hours, preferably overnight.

To serve, loosen sides with a knife and release side of pan.

Serves 12.

Sunday, June 13, 2010

Preparing Your Baking Pans

When you are baking, your recipe always specifies if you need to prepare your pans in any special way.

But sometimes you can do things a bit differently and still have fabulous results.

When the recipe states to grease the pan, use solid shortening, not cooking oil.
Butter can also be used. But, shortening is recommended.

For pizza crusts, many times you can just sprinkle your pan or stone with cornmeal instead of using shortening. But, use shortening if you are making a pan pizza so the crust won't stick to the sides of the pan.

When making cookies, instead of greasing the pan you can line it with parchment paper. You can also buy silicone mats to line cookie sheets with. The cookies will slide off either the parchment or silicone mat lined pans.

For baking goods that call for flouring and greasing the pan, you can buy sprays that are a combination of flour and cooking spray. One brand is Baker's Joy and the other is made by Pam cooking spray.

When you are making something chocolate and you need to grease and flour the pan, instead of flour- use cocoa powder. 
You won't have a white ring show on the brown chocolate.


If you have a non-stick pan, do not use cooking spray on it.
The spray leaves a residue that may build up and be hard to remove.


Hopefully these tips will help you.

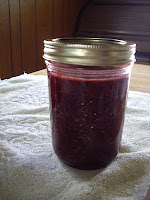
Strawberry Jam

Strawberry jam is always a great treat. It is also pretty simple to make.
Jam can be made at any time of the year. If you don't have fresh fruit, use frozen.

You will need 5-6 half pint jars or 3 pint jars.
Flats and bands for sealing.

Prepare your jars, lids(flats), and bands by washing them in hot soapy water.
Drain.
Keep the jars and lids and bands in very hot water while you get the jam made.

For the jam:

You will need a large pan. A 5 quart dutch oven is just about perfect.

Ingredients:

8 cups strawberries, crushed
5 cups sugar
2 Tablespoons lemon juice
 
Put the strawberries in the dutch oven and crush them. A metal spatula will work as will a slotted spoon. If you have a potato masher, that is perfect.

Add the sugar and lemon juice and stir.

Bring to a boil over high heat. Stir frequently.

Boil until it is translucent and thick. It will take about 25 minutes.
Don't go much longer than that or your jam might get gummy. It is better to have it a bit soft than too gummy.

Skim off any foam. If you have some foam you have trouble removing, it won't hurt anything so don't worry too much about that.

Remove jars from the hot water. Do this about 5 minutes before filling.

Ladle the jam into the jars leaving about 1/4" headspace.

Wipe off the jar rims.

Get a hot damp cloth.
Wipe the seal of the lids and lay on the jars.
Wipe the threads of the bands and screw the bands onto the jars. 

Do this as quickly as you can.

Turn jars upside down for 5 minutes before turning back upright to cool. 

Friday, June 11, 2010

Strawberry Shortcake


Strawberry shortcake is such a summery dessert.
You can make one big shortcake and serve it in pieces, but I like doing the individual shortcakes.
Kids love having their very own shortcake and you can make them as you need.

Preheat your oven to 450 degrees Fahrenheit.
You will need an ungreased baking sheet.

Ingredients:

6 cups sliced strawberries
1/4 cup sugar

2 cups flour
1/4 cup sugar
2 teaspoons baking powder
1/2 cup butter(1 stick)
1 beaten egg
2/3 cup milk
1 cup whipped cream

Mix the strawberries and the 1/4 sugar. Set off to the side.
In another bowl mix the flour, baking powder, and 1/4 cup sugar.
Cut in the butter.
Add the egg and the milk at once.
Stir until moistened.
Turn dough out onto well floured surface. Knead gently until dough is not sticky and workable- about a minute.
Pat dough to about a 1/2" thick.
With a 2-1/2"-3" biscuit cutter cut out 6-7 shortcakes.
Put on the baking sheet.
Bake for 12-15 minutes. At 12 minutes do the toothpick test. Toothpick should come out clean.
Remove shortcakes to wire rack to cool slightly.

To assemble:
Split shortcake in half.
Spoon some strawberries onto bottom half.
Top with dollop of whipped cream.
Add top half of shortcake.
Spoon strawberries over top.
Add dollop of whipped cream.


Makes 6 or 7 shortcakes.


If you prefer to make one large strawberry shortcake:


Instead of kneading dough, spread it into a greased 8" round pan. Bake for 15-18 minutes and do the toothpick test to make sure it's done.
Cool in pan for 10 minutes.
Remove from pan.
Split cake into 2 layers and add half the strawberries and cream.
Add top layer and rest of strawberries and cream.
Makes 8 servings.

Jams, Jelly, or Preserves

Making jams, jellies, and preserves are a great way to make the most out of your fruit.

Jams and preserves have the most in common. Both of them are made with the fruit.

Jams are made with crushed fruit or fruit pieces. You just put chopped or crushed fruit in a pan with sugar and anything else called for and cook it.

Preserves are made with whole fruits and sugar.
You add the fruit and sugar and let it stand awhile and than you cook it.

Jellies are made in a two-step process.
First you make juice from the fruit.
Than, you add your sugar to the juice along with optional pectin to make the jelly. 

All of them are good. 
But that's what the difference is between them all.
   

Thursday, June 10, 2010

Double Fudge Brownies


These brownies are extremely fudgy and yummy.
And you'd never guess that they are made with whole wheat flour.

For the best texture, let them sit overnight before cutting and serving.

Preheat your oven to 350 degrees Fahrenheit.
Lightly grease a 9" x 13" baking pan.

Ingredients:

1 cup(2 sticks) unsalted butter
2 cups packed brown sugar
3/4 cup Dutch process cocoa powder
1 teaspoon baking powder
1 teaspoon salt
1 teaspoon espresso powder-optional
1 Tablespoon vanilla extract
4 eggs
1-1/2 cups whole wheat flour
2 cups semisweet chocolate chips

Melt the butter in the microwave or on the stove.
Add the brown sugar and stir in.
Heat or microwave it again, just until bubbly.
Stir in the cocoa powder, baking powder, salt, optional espresso powder, and vanilla extract.
Let the mixture cool down to lukewarm.
Add eggs one at a time to make make they are blended in well.
Add the flour and chocolate chips and stir until smooth.
Spread the batter into the baking pan.
Bake for 30 minutes. When testing with a toothpick, crumbs will cling to the toothpick.
Cool on a wire rack.
Cut into bars after letting them sit overnight.
Makes 20-24 brownies.


Handling Hot Peppers


Working with hot peppers can be hard on your hands.

Even if the pepper doesn't seem to be that hot, the oils in the peppers can make your hands burn.
Especially if you will be seeding and/or chopping several of them.

The best way to handle a hot pepper is to cut them in half and use a sharp knife to scrape out the membrane and seeds.
The membrane and seeds have a lot of the hot oil and touching them will make your hands burn more than touching any other part of the pepper.

Once you have got the seeds out, lay the pepper cut side down to avoid touching the oils in it.

If you have disposable kitchen gloves now is the time to wear them.

That way you can scrape out seeds with your gloved hands if you have trouble scraping them out with your knife.

When you remove them, do so that you are turning them inside out as you peel them off.

If you don't wear gloves, washing your hands will not always take all the oils away.
Some times they linger and when/if you touch your face, your face may burn.


Wednesday, June 9, 2010

Strawberry-Rhubarb Pie


Strawberry-rhubarb pie is a classic. Both fruits are in season right now, so why not put them together?

In this recipe, I give two amounts for the sugar.
If you like your pie less sweet, use the 3/4 cup. If you like it good and sweet use the full amount of 1-1/2 cups.

Preheat your oven to 400 degrees Fahrenheit.
You will need a 9" pie plate.

Ingredients:

Pastry for 2-crust 9" pie

3/4 to 1-1/2 cups sugar
1/3 cup flour
1/4 teaspoon salt
1/4 teaspoon nutmeg
3 cups rhubarb, chopped into 1/2" slices
1 cup sliced strawberries
1 Tablespoon butter

Combine sugar, flour, salt, and nutmeg in a large mixing bowl.
Add the rhubarb and strawberries and toss. Let sit for 20 minutes.
Put bottom crust into pie plate.
Pour fruit mixture into the crust.
Dot with the butter.
Cover with top crust and seal.
Make 5 slits on top to allow steam to escape during baking.
Bake for 40-45 minutes until the filling is bubbling thickly.

Let cool for at least a few hours for the pie to set up.

Serves 6-8.

How Hot Is A Very Hot Oven?


If you have ever looked through an old cookbook, you have probably seen directions for baking with wording such as Bake in a slow oven.

But how are you supposed to know what temperature that is?

Here is a chart that will give you a close estimate.
The degrees aren't exact. You have a 25 degree range, but it will work.

Very slow oven....................250-275 degrees Fahrenheit

Slow oven..........................300-325 degrees Fahrenheit

Moderate oven................... 350-375 degrees Fahrenheit

Hot oven...........................400-425 degrees Fahrenheit

Very hot oven....................450-475 degrees Fahrenheit

Extremely hot oven............500-525 degrees Fahrenheit

Tuesday, June 8, 2010

What Makes A Food Whole Grain

The Whole Grains Council defines whole grains this way:
Whole Grains or foods made from them contain all the essential parts and naturally occurring nutrients of the entire grain seed. If the grain has been processed the food should give you about the same balance of nutrition that is found in the original grain.

The more processed the grains are, the more nutrients are lost.

When baking with whole grains, it is possible to bake with all whole grains, but most baked goods benefit from a mix of whole grain and all-purpose flours.

Many times, to get the best texture you will need to use both flours. If you do use all whole grain flour, you may want to let the baked food rest overnight to soften up the rougher texture of a whole grain such as whole wheat.

If you are wanting to add more whole grains to your recipes, try experimenting with 1/4 whole grains and increase until you find the taste and texture that you want.

Chocolate-Chocolate Chip Cookies


Chocolate-chocolate chip cookies are for the serious chocolate lover. When you want some chocolate, this cookie always satisfies.

Preheat your oven to 375 degrees Fahrenheit.
You will need a couple of ungreased cookie sheets.

Ingredients:

2-1/4 cups flour
1 teaspoon baking soda
1 teaspoon salt
1/3 cup cocoa powder
1 cup(2 sticks) unsalted butter, softened
3/4 cup sugar
3/4 cup packed brown sugar
1 teaspoon vanilla extract
2 eggs
2 cups chocolate chips

Combine the flour, baking soda, salt, and cocoa powder in a bowl and set aside.
Beat the butter, brown sugar, sugar, and vanilla extract in another bowl until the mixture is creamy.
Add the eggs one at a time.
Blend in flour mixture.
Add the chocolate chips.
Drop by Tablespoon or medium size cookie scoop onto cookie sheets.
Bake for 9-11 minutes. They may be a bit soft in the middle and that is OK. They will finish cooking after they come out of the oven.
Remove to wire rack to cool.
You will get 4-5 dozen cookies.


Monday, June 7, 2010

Waffles


I love waffles. I have to say, I don't think I have met a waffle I didn't love. This is a really simple recipe for homemade waffles.
I make Belgian waffles, which are the large ones with deep pockets.
But, just a regular waffle maker still works great with this recipe.


Preheat your waffle maker per manufacturer instructions.

Ingredients:

1-3/4 cups flour

1 Tablespoon baking powder

1/4 teaspoon salt 2 eggs
1-3/4 cups milk

1/2 cup cooking oil


In one bowl stir together the flour, baking powder and salt. Set off to the side.

In a second bowl mix the eggs, milk, and oil.

Dump the liquid mixture into the flour mixture and stir just until moistened. The batter will be lumpy.

Pour 1-1/14 cups batter onto the grids of the waffle maker and bake until done. It will take 3-4 minutes.
Carefully remove waffle from the maker.
Repeat with the remaining batter.
You will get 12-16 waffles on a 4" waffle maker.

You will get about 4 waffles using a Belgian style waffle maker.

Serve with butter and your favorite syrup.

Fruit is great on these waffles too.

Sunday, June 6, 2010

Cutting Your Bars

Here are a couple of tips for making a great cut for bars.

When you cut brownies, it always seems as if the brownies want to come up a bit with your knife.

The best way to make sure this doesn't happen is to let the brownies cool thoroughly before cutting them.

But who doesn't love a warm from the oven brownie?

So, another option is to layer your baking pan with aluminum foil.
Let the ends hang over.
When the brownies are done, you can grab the ends of the foil and lift the brownies out of the pan.
Turn the brownies upside down and remove the foil.
Cut the brownies from the bottom side.
You will still want the brownies to cool at least slightly before cutting.

Another great way to cut bars is to use a pastry scraper to make cuts. Just push the scraper straight down and you will get an even cut. I have never ended up with bad edges cutting bars this way.

Lemon Bread


This quick bread has a very mellow lemon flavor. It is pretty moist and tasty.

Preheat your oven to 350 degrees Fahrenheit.
Grease the bottom and 1/2" up the sides of an 8" x 4" loaf pan.

Ingredients:

1-3/4 flour
3/4 cup sugar
2 teaspoons baking powder
1/4 teaspoon salt
1 egg, beaten
1 cup milk
1/4 cup cooking oil
1 Tablespoon lemon juice
2 teaspoons finely shredded lemon peel
1/2 cup chopped almonds or walnuts- optional
2 Tablespoons lemon juice
1 Tablespoon sugar

In a bowl mix the flour, sugar, baking powder, and salt. Set to the side.
Combine the egg, milk, cooking oil, and 1 Tablespoon lemon juice in another bowl. Add all at once to the flour mixture and stir just until moistened.
Fold in the lemon peel and the nuts, if you are using.
Pour into the loaf pan.
Bake for 50-55 minutes until it tests done with a toothpick or cake tester.
While the bread is baking, mix the 2 Tablespoons lemon juice and 1 Tablespoon sugar.
After taking the bread out of the oven, brush the lemon juice sugar mixture over the top. Do this before you remove the bread from the pan.
Cool the bread in the pan for 10 minutes.
Loosen and turn out onto a wire rack to cool.
Wrap in foil or plastic wrap overnight before serving.

Saturday, June 5, 2010

Choosing a Baking Pan


When it comes to baking different foods, the finish can make all the difference in the world.

For baking cookies, a shiny finish will give you the best result. Your pan should be with no or very low sides to allow the heat to fully surround the cookies.

For baking brownies, breads, and cakes, a dull finish is the best.
A shiny finish reflects the heat and is a poor conductor.
A dark finish will cause the baked goods to cook much faster than it should.

Pies bake best in a dark finish. They also do well in Pyrex, ceramic, and stone.
Shiny pans don't produce the best crust. They don't really brown and don't seem to crisp up as well on the bottom.

If all you have is a pan with a dark finish, decrease the baking temperature 25 degrees for cakes and breads.
For cookies, they may cook faster so check them a few minutes before the first baking time stated in the recipe.

For baking pies in a shiny pan: one way to make the bottom crust crisp up well is to preheat the oven with a baking stone or a cookie sheet and bake the pie on that.
It will still have a lighter crust, especially if it is a shortening crust.
If you have shiny cake pans they will still make a good cake, but when it comes time to get news ones, buy ones with a dull finish.


Mini Meatloaves


Mini meatloaves are one of my favorite meat foods. There isn't much to making them.
You can mix them up and bake them all in an hour.

Preheat your oven to 350 degrees Fahrenheit.
Lightly grease a 9" x 13" baking pan.

Ingredients:

1 egg
3/4 cup milk
1 cup shredded cheddar cheese
1/2 cup oatmeal, preferably quick cooking but regular works too
1 teaspoon salt
1 pound ground beef
2/3 cup ketchup
1/4 cup brown sugar
1-1/2 teaspoon mustard

In a bowl mix the egg, milk, cheese, oatmeal, salt, and ground beef.
Form into 8 loaves and put into baking pan.
In another bowl combine the ketchup, mustard, and brown sugar. Spoon that over the mini meatloaves.
Bake uncovered for 45 minutes.

Serve.

Wednesday, June 2, 2010

Making Chocolate Curls and Chocolate shavings


Using chocolate curls and chocolate shavings as a garnish is a simple way to make a dessert look very elegant.

To make the curls you will need a vegetable peeler or a paring knife.
To make shavings you will need a paring knife, preferably serrated.

You will also need either gloves or something to wrap around the chocolate to keep the heat from your hand from making the chocolate soft.

Take a piece of chocolate, either a candy bar or a square of baking chocolate and put it in the refrigerator for 15 to 30 minutes prior to shaving it or making curls.

Now, to make the curls, run the peeler or knife along the edge as if you were peeling a potato. As you peel it, the chocolate will naturally curl.
If the chocolate starts to soften, stick it in the fridge to firm up again.

To make shavings, use your knife to cut through the chocolate, getting as close to the edge of the bar as possible. If it is cold and firm enough, the chocolate should come off the bar in little shavings.
Just like making curls, if the chocolate starts to soften firm it back up in the fridge before shaving anymore.

Make sure to have the gloves on or something protecting your hand from the chocolate. You might think, you don't want to make much so the chocolate won't soften or melt, but it does not take long.

Rhubarb Cookies


You can never have too many rhubarb recipes.
I take them whenever I can find them.

These cookies are super soft.
So, if you like rhubarb and soft cookies, these are for you.

Preheat your oven to 375 degrees Fahrenheit.
You will need 2 or 3 ungreased cookie sheets.

Ingredients:

2 cups flour
1 teaspoon baking soda
1 teaspoon baking powder
1 teaspoon ground cinnamon
1/2 teaspoon ground cloves
1/2 teaspoon salt
1/2 cup unsalted butter, softened
1 cup sugar
1 egg
1 cup chopped rhubarb
1/2 cup raisins-optional

Mix flour, baking soda, baking powder, cinnamon, cloves, and salt in a bowl. Set aside.
Cream the butter and sugar in another bowl.
Add the egg.
Stir in the rhubarb.
Add the flour mixture and than the raisins.
Drop by spoonfuls or cookie scoops onto cookie sheets.
Bake 12-15 until lightly browned.
Cool on the cookie sheets about 5 minutes before removing to a wire rack.
Makes 30-36 cookies.

Tuesday, June 1, 2010

3 egg white Meringue


This is a recipe for a meringue for pies.

You will need a mixer for making this.

Ingredients:

3 egg whites
1/2 teaspoon vanilla extract
1/4 teaspoon cream of tartar
6 Tablespoons sugar

In a large mixing bowl combine the room temperature egg whites, vanilla extract, and cream of tartar.
Beat with a mixer on medium speed about a minute until soft peaks form.
Add the sugar a tablespoon at a time, beating on high.
Beat for about 4-5 minutes until stiff peaks form.
Spread over hot pie filling and seal to edge of pastry.
Swirl the top to make it really pretty.
Bake in a 350 degree Fahrenheit oven for 15 minutes.
The meringue will be lightly browned.

Tips for Making a Really Great Meringue For Your Pie


Making a meringue for a cream pie can be intimidating, but it really is pretty simple.

You can find different recipes for making meringue.
They are pretty much the same.

But no matter the recipe, there are some things you can do to make sure your meringue comes out great every time.

First thing is to make sure you have ABSOLUTELY no yolk or shell or any bit of fat in the bowl you are using to make the meringue.
The whites need to be free of fat to get fluffy and white like you want.

Let the egg whites warm up to room temperature before beating them. The will get bigger if they are at room temperature.

When it comes time to add the sugar, add it slowly. Just one tablespoon at a time. If you add too much sugar too soon, the egg whites don't hold up as well and the meringue will not be as smooth and velvety.

Make sure the meringue is beat to very stiff peaks.

When putting meringue on pie, make sure the pie filling is hot.
Also make sure to seal the filling in well with the meringue.
If it isn't sealed in well, the meringue will end up shrinking and than weeping.


Homemade Hamburger Buns

I know you are probably thinking why make hamburger buns when they are just so easy to buy.

For a few reasons.
You have the ingredients to make the buns and want hamburgers but have no hamburger buns in the house.
You just feel like making them.
The taste. I love homemade buns over store bought anytime.

The dough comes comes together pretty quickly.
And if you are lucky enough to have a stand mixer with a dough hook it will come together even quicker and easier.

With rising times, mixing time, and baking time it will take about 2 hours.

Ingredients:

4-1/4 to 4-3/4 cups flour
1 package(2-1/4 teaspoons) active dry yeast
1 cup milk
1/3 cup sugar
1/3 cup butter or shortening
3/4 teaspoon salt
2 beaten eggs

In a large bowl mix the yeast with 2 cups of the flour.
In a medium saucepan heat the milk, sugar, salt, and butter just until butter almost melts.
Add the milk mix and eggs to the flour and yeast.
Beat with a mixer on medium for about a minute. Scrape down sides and beat on high speed for 3 minutes. If you have a stand mixer, beat for a couple minutes on medium speed.
If you have the stand mixer or mixer with a dough hook, add the rest of the flour, switch to the dough hook and knead the dough til velvety smooth.
Otherwise, after beating the dough on high speed stir in as much of the remaining flour as you can.
Turn the dough out onto a floured surface and knead til dough is smooth and elastic. That will take about 5 minutes or so.
Grease a large bowl and put dough into it.
Cover and let rise until double in size.
That will take about an hour.
Punch down the dough. Let rest for 10 minutes.
Divide the dough into 12 pieces and shape into balls.
Grease a couple cookie sheets.
Put the balls onto the cookie sheets and flatten the balls into buns about 4" across.
Cover and let rise for about 30 minutes until they are double in size.
While the buns are in their final rise preheat your oven to 375 degrees Fahrenheit.
Bake the hamburger buns for 12-15 minutes until golden in color.
Cool on a wire rack.

These freeze really well.